Are you new to podcasting? Most new podcasters like to start out on a Blue Yeti Microphone since it’s a budget-friendly option but offers a cute accessory for photoshoots. While this is a beginner tool, it’s easy to become overwhelmed when you’re not sure how to use it. In this post, I will walk you through the proper way to set up and record with your Blue Yeti. I will also describe each setting and what it is used for. Let’s get started!
If you haven’t purchased your microphone, I highly encourage you to take a look at my recommended gear guide for podcasters before you invest in your microphone!
Setting Up Your Blue Yeti Microphone
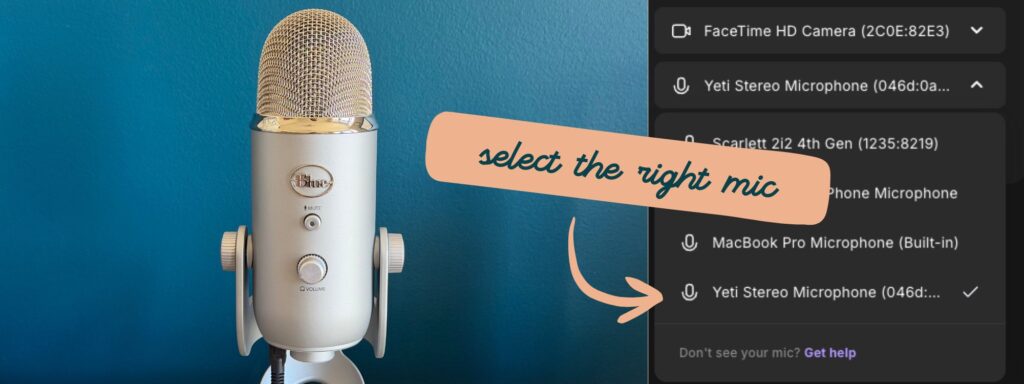
First, you need to plug your Blue Yeti into your computer. Make sure that the USB cable is securely connected and not loose. Once plugged in, open up the settings on your computer. You should see an option to select a microphone – make sure to choose the Blue Yeti as your microphone input source. Next, it’s time to adjust the settings.
Blue Yeti Microphone Recording Modes
On the Blue Yeti, there are four different settings you can use: cardioid, stereo, omnidirectional, and bidirectional. Each setting has a different purpose, so it’s important to know which one is right for your recording needs.

Cardioid mode is ideal for podcasts and voice recordings, as it is sensitive to sound coming from only one direction. This makes it ideal for solo recording without background noise. When speaking into your microphone on this setting, you want to speak into the side that has the Logo and the mute button, as this is the front of the microphone.
Stereo mode records sound from both the left and right channels, so you can create a more spacious audio effect. It’s great for capturing multiple voices at once or layers of sound.
Omnidirectional mode records sound coming from all around the microphone. It’s perfect for capturing a large group of people speaking at once or recording natural ambient noise. While I don’t often recommend this recording method, it is an option if you’re stuck in a situation with just one microphone.
Bidirectional mode is best used when you need to record two separate sources simultaneously – like an interview, for example. This setting allows you to capture both sources in one take. When speaking into your microphone in this setting, you want to speak into the front and the back (the front of the microphone is the side that has the Logo and the mute button).
Adjusting the Gain on Your Blue Yeti
Now that you know the different settings, it’s time to adjust them to your needs. The Blue Yeti has a gain knob, which allows you to adjust the microphone sensitivity. Make sure to set this according to what type of sound you are trying to capture – if you need more clarity in your recordings, then turn up the gain. I encourage hosts to test out their own voice and setup by playing around with the gain while recording a test track to see what audio they like.
Finally, make sure to set your recording software correctly. Most programs allow you to select the input source and adjust levels—make sure you select the blue yeti as your input source and adjust the levels so that they are not too low or too high.

There you have it! You now know how to properly set up and record with your Blue Yeti. Whether you are just starting out in podcasting or have been recording for years, this guide will help you get the most out of your microphone. Now go and make some great audio recordings! Good luck!
Do I recommend the Blue Yeti? Actually, no, I don’t!
If you’re still playing around with which microphone to get, make sure you check out my own Podcast Gear Guide! While I work with plenty of podcasters who love the Blue Yeti, it’s actually not the tool I tend to recommend! The Samson Q2U is a great alternative and competitively priced!
The Blue Yeti tends to pick up more sounds than you want and often creates an echo. Take a listen to this sample audio from a Blue Yeti microphone:
If you decide to use any of the links above and buy through them, I’ll receive a small commission back.